From version 1.2.8.0 of our application, a new and very complete label designer has been incorporated. To help you get the most out of it, we have put together this little guide. We hope you find this new tool useful and attractive.
1 – How to generate the tags
Before printing labels or designing templates, they must be generated in the application. We have several ways and systems to generate them, so we will explain below the window of generation of them.
 Data Range
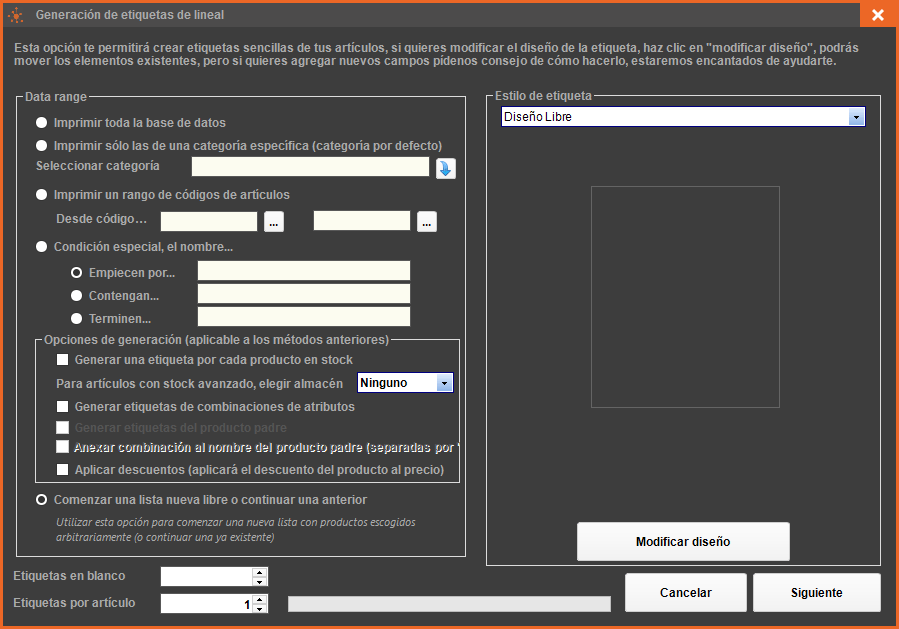
In this part of the window we must specify the range of data for the generation of labels. We have 5 different options, besides other secondary options that apply according to the case.
- Print the entire database: With this option, all the products in the database will be printed, the active and deactivated ones.
- Print only those of a specific category: To print only the labels of a specific category, select in the combo the category for which you want to generate the labels.
- Print a range of item codes (ID): Select this option and specify in the boxes from which you want to print.
- Special condition, the name: Select below the special condition for the name, which begin with a literal, contain or end. Only labels of products that meet the condition will be generated.
- Start a new free list or continue a previous one: This option has 2 applications, on one hand it serves to create a customized list of labels from scratch and also serves to continue a list generated manually or with any of the other 4 methods.
When selecting any generation option, we will be asked if the generation file already contains previous tags or not, if we answer NO to the question, the tags will be removed to generate the new ones, while if we answer YES, the new tags will be attached to the ones that already exist.
generation options applicable to automatic methods (the first 4)
- Generate a label for each product in stock: If you check this box, a label will be generated for each product in stock, therefore, the lower box “labels per item” will be disabled and the program will generate as many labels as units of the product.
- Generate labels from attribute combinations (with 2 extra options). If you check this box but do not check any of the 2 following ones, the program will generate labels of combinations only. If you click on “generate parent product labels”, in addition to the above, it will also generate the main product label from which the created combinations hang. If we click on “attach combination to parent product name” the description of the product label will be composed of the parent product name plus the combination separated by a token (!). For example, a shoe whose attributes are sizes, the description would be Shoe | size:35, Shoe | size:37, etc.
- Apply discounts: If you check this box, the specific prices will be applied to the price of the product.
Blank labels: If you use APLI or similar label templates, this field will help the program to skip the labels you already have used in that template, counting from the top left corner and in lines from left to right and from top to bottom. So for example, if it is a template of 3 labels wide by 20 high, and you put 8 blank labels, innovacommerce will not print anything in the first 2 rows and 2 labels in the third row.
Label style
Innovacommerce already incorporates preset designs of the most used APLI tags, which you can adapt to your designs in case they differ a little bit using the designer we will explain below. The “free design” option loads a default template that you can modify as you wish without modifying the ones the program already has by default. Before clicking “NEXT” which will generate the labels, you must select here the final design you want for your labels.
2 – THE LABEL DESIGNER
Innovacommerce incorporates a powerful label editor which has many options, but we will explain the most basic for its operation.
When you start the designer for the first time, it will ask what kind of interface we want to use, we recommend the “standard gui” interface to be the same one we use in this tutorial so you can easily locate the options described.

The main interface of the designer shows this aspect , with 4 perfectly differentiated areas:

1 – In this area we have the design buttons, if we want to add lines, images, text, bar codes, etc. It’s as simple as chopping what we want to add and adding it to the document as if it were a word, and then sizing it and applying design (in area 3, which we explain later).
2 – This is the quick design area, it is composed by the menu where the save commands are (which is the one we are interested in), besides other commands related to the view and design of the document. Like Word, its buttons are very similar in terms of changing fonts, text size, bold, italics, etc. All of these affect the selected object in the document.
3 – This area is the properties area of the object we select, including the document page itself. By changing properties we will change the appearance and behavior of the selected object. There are the area 2 commands, but also other more specific ones such as sizes in centimeters, margins, paddings, shading, borders, etc.
4 – The design area, in this part you can see the design of the document, above we have 4 tabs, we will only use the one called “Page1” and “Preview”. In the first tab we have the graphic design and in “preview” we’ll see a preview of how our labels will look.
Very important: You can modify the size of the items that already exist, but DO NOT DELETE THEM because those are the minimum data your label needs to be seen, inside the design of your label you can add everything you want, from text boxes to images with logos or other bar codes. The fields between brackets ({ }) are fields that come from the database so DO NOT MODIFY THEM, you can add text just after the key that closes }, so for example, if you want to add a currency symbol, double click on the field where the price appears:

In the window the type of field that is inserted will appear, click on “expression”.

And already there, right after the }, we add the symbol “euro”

And we click on OK, this way, the symbol is added after the price:

3 – The barcode
The barcode on the label can be of any format, if you use ean13 or ean8 barcodes you can leave it as it is since it is the default barcode type, but if you use other type of codes (code128 for example), you must indicate the correct format, to do so, click (not double click) on the barcode.

Now, let’s go to area 3 on the right and look at section 1 – Bar Code.

In “Bar Code Type” we change the type of barcode we want to use and you will see how the code on the label changes to the desired format.
4 – The name of the product
If the field for the name description is too small, you can enlarge it and adjust it as you wish, to do so, click (not double click) on the product name field:

When you select it, you will see the 8 size set points, adjust it as you wish (this is also true for all the elements you insert).

As with the barcode, when selecting a text field we can adjust its properties in area 3, we can change the font type, style, if we want it to fit the box, if we want a border or a shading, among many other options, feel free to experiment to get the desired label.
5 – Finishing
Once we have made all the changes we want and as long as in “preview” we see that it looks good, we can click on “save report” in the “file” menu and with that our design will be ready so that labels can be generated on it and printed or exported to other document formats such as PDF.
Generating labels from other parts of the application
The label generator is a memory where we store those labels that we want to print, in this sense, the product labels can be sent to this memory from other points of the application, for their later printing.
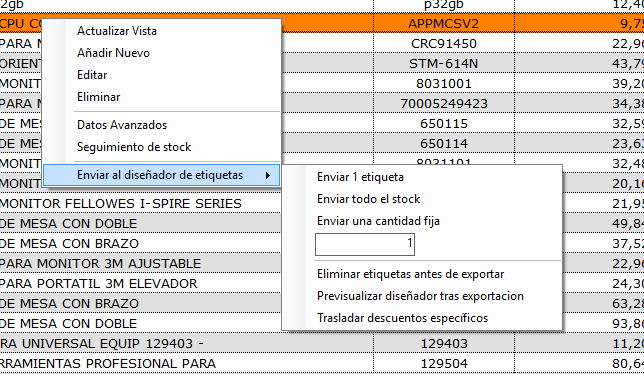
- Send labels from the catalogue management In the list of products, right-clicking on any of them we can send it to the generator with the typical generation options
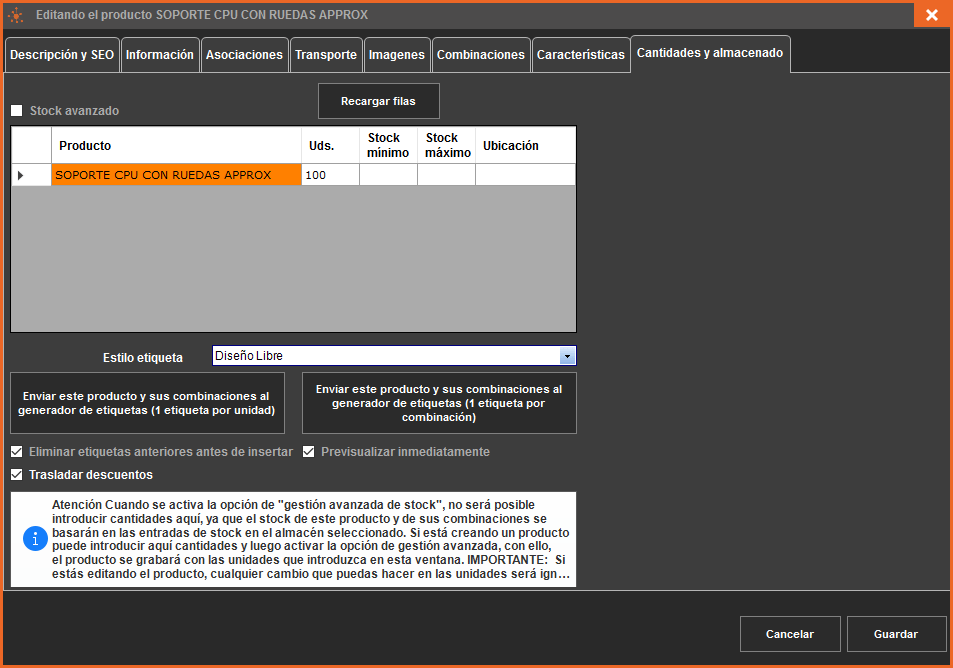
- Send labels from product creation It is interesting when you are creating a product, to be able to send already to the designer the labels of the same one for their later impression and labeling.
Send labels from the goods receipt From the goods receipt management you can also send the incoming order to the generator, this will help you to label the new products coming into your warehouse.